Smart Home Security
DIY Installation Tips for Smart Security Cameras
Key Takeaways
- Choose strategic locations for cameras to maximize coverage.
- Ensure a stable internet connection for seamless operation.
- Properly configure the settings for optimal security.
- Regular maintenance can enhance performance and reliability.
Installing smart security cameras can greatly enhance the safety of your home. With the growing variety of options available, the installation process can also be manageable right from the comfort of your own residence. This guide will walk you through the essential steps, best practices, and technical considerations for successfully installing your smart security cameras.
Why Install Smart Security Cameras?
- Deterrent for Theft: Visible cameras can discourage criminal activities.
- Remote Monitoring: Stay connected with real-time alerts and live feeds using your smartphone.
- Insurance Benefits: Many insurance companies offer discounts for installed security systems.
Preparation for Installation
Before jumping into the installation, it’s crucial to consider the following:
- Research and Select Your Camera: Choose a camera that fits your needs. Check reviews for recommendations on models like the SimpliSafe Wireless Outdoor Security Camera which offers features like 1080p resolution and night vision.
- Check WiFi Coverage: Ensure your WiFi signal is strong at the intended camera locations.
- Gather Tools: Common tools needed include a drill, screwdriver, and level.
Step-by-Step Installation Process
1. Choose the Right Location
Your camera placement is crucial for effective surveillance. Consider the following:
- Avoid aiming the camera directly at the sun.
- Place cameras at least 9 feet above ground for better coverage.
- Consider areas where intruders might enter, like doors and windows.
- Use a test stand to visualize and adjust angles before final installation.
2. Mount the Camera
Follow the manufacturer’s instructions for mounting your camera:
- Use a level to mark the mounting holes on the wall or surface.
- Drill pilot holes and install anchors if needed.
- Mount the camera base and tighten screws securely.
3. Connect to Power
For hardwired systems, ensure you follow local electrical codes. For wireless models, ensure you charge or insert batteries as directed in the manual.
4. Connect to Your Home Network
Most smart cameras require a connection to your home WiFi:
- Open the camera app on your smartphone and follow the in-app instructions.
- Connect the camera to your WiFi network using the credentials provided.
5. Configure the Camera Settings
Customize settings for motion detection, alerts, and recording schedules according to your preferences.
Regular Maintenance Tips
To keep your security camera system running smoothly, follow these maintenance tips:
- Clean lenses regularly to avoid blurriness.
- Check for firmware updates through the camera app.
- Test the alerts and notifications settings monthly.
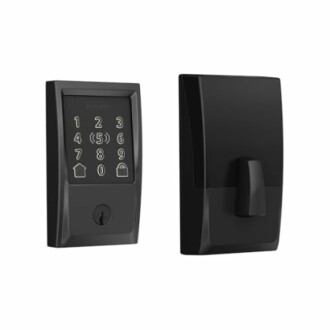 Smart Lock Solution
Schlage Encode Plus WiFi Deadbolt Smart Lock
Upgrade your home security with this keyless entry deadbolt featuring remote access and voice control through Alexa.
Learn MoreBest Practices for Smart Security Cameras
| Aspect | Tip | Reason |
|---|---|---|
| Placement | High & Angled | To reduce blind spots and avoid obstruction. |
| Lighting | Sufficient Lighting | To capture clearer images, especially at night. |
| Connectivity | Strong WiFi Signal | To prevent disconnection and latency. |
Conclusion
With the right tools and knowledge, DIY installation of smart security cameras can be completed in just a few hours. Remember to regularly assess your setup and adapt as necessary to ensure optimal functionality.
For more information on smart home systems, check out our Smart Home Security Systems Overview or browse our How-To Articles for further guides.